Over-engineering my résumé
I’ve never been fully content with how my résumé1 is formatted or presented. Normally I’d be fine with picking at it in Word or Google Docs since I only have to do this every few years, but since I have some free time and just re-did my personal site, I wondered: can I use my static site tool (Jekyll) to write my résumé in Markdown, and output both HTML (my preferred way share it) and PDF (what most recruiters want)?
HTML version
Using Jekyll to build my résumé in Markdown was straightforward, since it’s mainly a tool for outputting HTML. You can see the results at charlietran.com/resume. While making this version I also updated it a bit, as I got some helpful advice I got from staff at the Recurse Center:
- Focus on things I built, rather than broad responsibilities, and include specific metrics where possible
- Keep it to one page, omitting any work experience over 5 years old. My first jobs as a barista and customer service rep aren’t relevant anymore!
- I used to have a skills/proficiencies section, but for the senior-level positions I’m seeking, those aren’t really relevant as my first contact with a company will not be my résumé. These days, job conversations tend start because of inbound conversations from former coworkers and friends who know I’ve been in the game a while.
PDF version
Now the tricky part. Since I’m using Jekyll, I first sought out PDF plugins that could drop right into my build routine. There were two problems right away:
- The most popular Jekyll PDF plugin is out of date with many unsolved issues with the current version of Jekyll
- Even if that plugin worked, my site is running on Github pages, which has a strict whitelist of allowed Jekyll plugins, unsurprisingly not including anything related to PDF generation.
The second point could be solved by running whatever build process I wanted
locally and then pushing the static site up to my repo. But I really like having
git push as my deployment command, and also want to retain the ability to make
quick changes to my site via the Github interface.
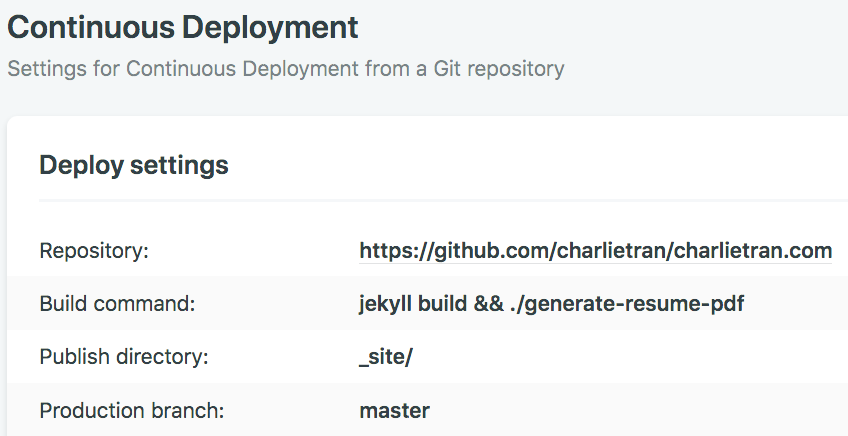
Switching from Github Pages to Netlify
Netlify has been praised by a few friends, but honestly I couldn’t understand what the fuss was about — it just seemed like a simple HTML hosting site. Then I understood that had the exact problem that their product is built to solve: I want to be able to push to my github repo, then have an arbitrary build command compile and deploy my static site.
Switching from Github to Netlify took me about half an hour. I authorized my Github account and public repos, checked that my site was still generating okay on the default URL that Netlify gave me, switched my DNS A and CNAME records over and then I was up and running with a more powerful static site setup!
 Screenshot of my Netlify setup
Generating the actual PDFs
While that Jekyll PDF plugin turned out to be unsuitable, I poked around the
source a bit and noticed that was simply a wrapper for the wkhtmltopdf
HTML-to-PDF tool, which can easily be used in a Netlify build by including the
wkhtml-binaries gem in the Ruby Gemfile. After much trial &
error, I made a small wrapper script that Netlify will execute right after
running jekyll build. A couple bumps along the road as I figured out how to
generate the PDF:
- As simple as the HTML page is, I needed the styling for the PDF to be much
simpler! So I read up on print-specific CSS media queries, and used them
to add some targeted styles that will only get triggered when a browser
(or PDF generation tool) identifies its media type as
print. - When I first generated the PDF with
wkhtmltopdf, the output was super tiny. After reading its large list of command line arguments, I figured out that I needed to set the--dpi 300flag. No matter how far along I get in my tech career, I find myself debugging printers…
And finally…
Now I can edit my résumé markdown locally in Vim or in Github’s web-based code editor, commit, and within seconds Netlify will deploy both the HTML and PDF versions. Even with Netlify’s free account, the speed at which I see my changes go live is an order of magnitude faster than I did with Github pages. I think the results turned out pretty nice!
For me, even though these two document outputs were fairly simple, all this effort was worth it because it allowed me to learn a couple new tools and services, and it got me to freshen my résumé, which I would normally dread doing without an arbitrary engineering problem attached :)
-
Since Merriam-Webster lists the most correct spelling of this word as “résumé”, I learned from this article that the way to type those accent marks (aka diacritical marks) on a Mac keyboard is to first hit
Option+e, then the letter. That shortcut didn’t work within Vim though, which has a different method for typing accented characters, which is to hitCtrl+k, then your letter, then the character approximating your diacritical mark. ↩